How to create OpenVPN server on AWS environment at low cost
This article is a translation of this article.
openvpnを使ってaws環境にVPNサーバを比較的低コストで構築する方法 - TORIPIYO DIARY
I created VPN server with OpenVPN to connect my home network to AWS environment. I referred to several web sites. I want to share the procedure in this article. I think this method can be applied to small and medium-sized enterprises company's network. The cost of VPN network is only t2.neno running cost. You don't need to install new network hardware. So we can get VPN network at relatively low cost.

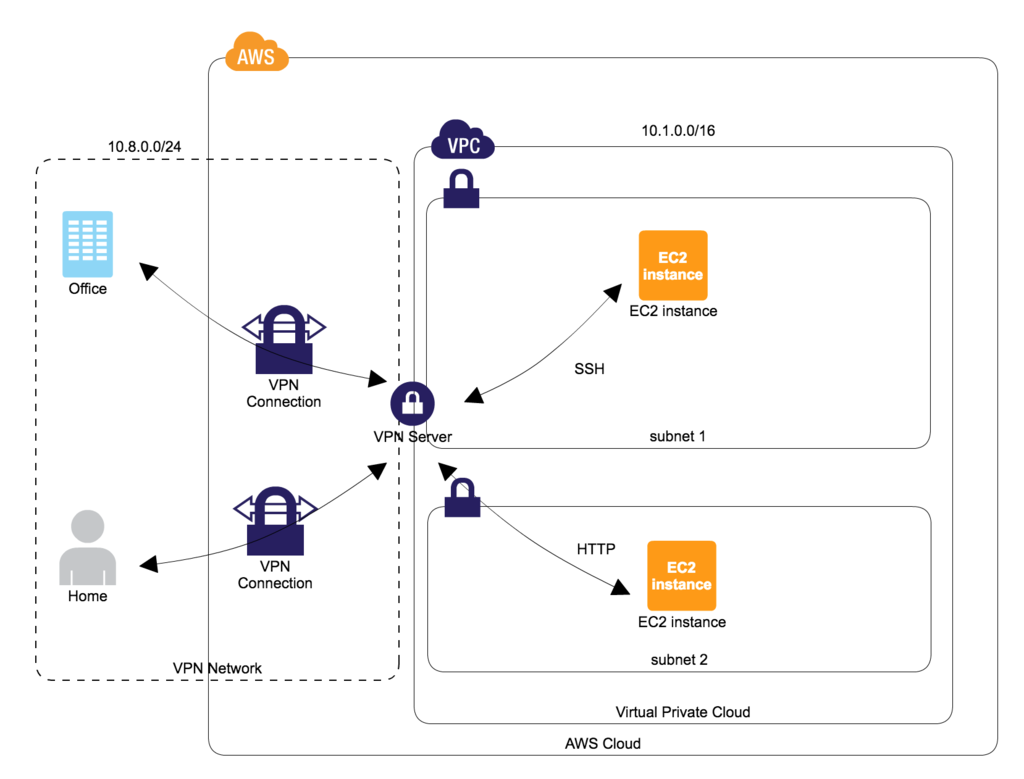
As the above diagram shows, VPN server will be constructed on AWS side.
By adopting the above architecture
- Users can make a connection of SSH and HTTP protocol through VPN server. The services doesn't need to be exposed to external network. For example, if developers want to directly access to database server from their local Mac machine, exposing database server into Internet environment is not required.
- By issuing certificate and key for individual user, If some users left from the development project, we can flexibly remove the access right of the users.
This article creates 1 VPN server for 1 VPC. So if you would like to use VPN server on multiple VPC environment, please take care that you need to create VPN server on each VPC environment.
Create VPN environment
VPN server construction
We don't need high spec instance for VPN server. It is enough to work for a few users usage.
spec
- AMI:amzn-ami-hvm-2017.03.1.20170623-x86_64-gp2, SSD Volume Type
- Subnet: subnet1 (Please configure subnet1's routing table to be able to communication with Internet.)
- instance type: t2.nano
- root volume: ebs
security group settings
Set below inbound configuration.
# 1194 port is used for VPN connection
TCP/1194
# 22 port is open for ssh operation. you may close this port after ssh operation
SSH/TCP/22
elastic IP settings
Fix VPN server's global IP address with AWS console.
adjust to be local time
modify clock file
vi /etc/sysconfig/clock

# ZONE="UTC"
ZONE="Japan" # this example is Japan time
UTC=true
modify symbolic link
# this example is Japan localtime
ln -sf /usr/share/zoneinfo/Japan /etc/localtime
Modify network configuration of OS
enable ip forwarding
echo "net.ipv4.ip_forward = 1" >> /etc/sysctl.conf
sysctl -w net.ipv4.ip_forward=1
cat /proc/sys/net/ipv4/ip_forward # confirm the value is 1
enable ip masquerade
echo "iptables -t nat -A POSTROUTING -s 10.8.0.0/24 -o eth0 -j MASQUERADE" >> /etc/rc.local (enable ip masquerade on boot)
install openvpn
package update
yum update -y
install openvpn package
yum install -y openvpn
install easy-rsa package
yum install easy-rsa -y --enablerepo=epel
generate certificate
generate CA certificate and key
cd /usr/share/easy-rsa/2.0
vi vars

# set adequate values to align with your organization
export KEY_COUNTRY="JP"
export KEY_PROVINCE="Tokyo"
export KEY_CITY="Ota-ku"
export KEY_ORG="Cat Inc."
export KEY_EMAIL="admin@toripiyo.com"
export KEY_OU="Development Unit"

. ./vars
./clean-all # "NOTE: If you run ./clean-all, I will be doing a rm -rf on /usr/share/easy-rsa/2.0/keys" message will be shown.
./build-ca # use default value
generate server certificate and key
./build-key-server server # set "common name" => vpn host name
generate client certificate and key
- basically default values are fine on input prompt
- below is a example of "tama" user's client certificate and key generation
./build-key tama
generate Diffie Hellman parameters
# it takes a while
./build-dh
configuration of certificate revocation
- create a dummy certificate tentatively to make a certificate revocation list
cd /usr/share/easy-rsa/2.0
. ./vars
./build-key dummy # use default value
./revoke-full dummy # keys/crl.pem file will be generated
openvpn server configuration
edit server.conf file
some sites describe to use udp. however tcp was more stable on my environment
sudo cp /usr/share/doc/openvpn-*/sample/sample-config-files/server.conf /etc/openvpn/

vi /etc/openvpn/server.conf

# update with below configuration
port 1194
proto tcp
dev tun
ca /usr/share/easy-rsa/2.0/keys/ca.crt
cert /usr/share/easy-rsa/2.0/keys/server.crt
key /usr/share/easy-rsa/2.0/keys/server.key  # This file should be kept a secret
dh /usr/share/easy-rsa/2.0/keys/dh2048.pem
server 10.8.0.0 255.255.255.0
ifconfig-pool-persist ipp.txt
push "route 10.1.0.0 255.255.0.0" #in the case vpc internal private ip range is 10.1.0.0/16
keepalive 10 120
comp-lzo
max-clients 20
persist-key
persist-tun
status openvpn-status.log
log-append  /var/log/openvpn.log
verb 3
crl-verify /usr/share/easy-rsa/2.0/keys/crl.pem
enable openvpn service on boot
chkconfig openvpn on
start openvpn service
openvpn /etc/openvpn/server.conf
server restart
- confirm openvpn server works as expected even if server is restarted
reboot
VPN client configuration
configure a client side for VPN connection after VPN server construction
install tunnelbrick
install with cask
brew cask install tunnelblick
get certificate and key
(user name).key, (user name).crt, ca.crt files are required. Please transfer these files to client machine by some methods (ex. scp)
generate client.conf file
- create .vpn directory under Mac's home directory.
- put (user name).key, (user name).crt, ca.crt files into .vpn directory.
- generate client.conf file with below configuration on .vpn directory. (client.conf file name can be changed as you like)
- client.conf
client
dev tun
proto tcp
remote (vpn server's global ip address) 1194
resolv-retry infinite
nobind
persist-key
persist-tun
ca (ca.crt file's path)
cert ((user name).crt file's path)
key ((user name).key file's path)
remote-cert-tls server
comp-lzo
verb 3
VPN server operation
how to add new client
if new user want to join your VPN server, please follow below procedure.
then share the generated (user name).crt, (user name).key, ca.crt files to new user.
cd /usr/share/easy-rsa/2.0
. ./vars
./build-key (new user name) # use default value
* openvpn service reboot is not required
how to remove existing client
if you want to remove specific user (ex. retired), please follow below procedure.
cd /usr/share/easy-rsa/2.0
. ./vars
./revoke-full (target user name) (keys/crl.pem file is generated)
* openvpn service reboot is not required